Monday, December 12, 2016

Christmas Memories

Good Morning ! It's Lisa here to share a Project Life card that I created using Brush Grunge Alpha and the Cherish Simple Sentiments sets. One of the great things about Honey Bee Stamps is that you can mix and match the sentiments to create your own titles!
HB10
For this card I used the Spellbinders "Build a Wreath" die set. I ran it through my Sizzix Big Shot three separate times to get the "Layers" of the wreath. I used regular Kelly green cardstock from Michaels. Once I had all of the pieces cut for the wreath, I used Memento Cottage Ivy Ink and Distress Ink in Shabby Shutters to add shading to the cardstock.
HB11
I added red Stickles to look like berries & tied a bow for the bottom of the wreath. I then used the Brush Grunge Alpha to stamp Christmas.
p3
I inked up the stamps & stamped once on scratch paper, then stamped on my cardstock. This gave it a little more distressed appearance. I did the same process with the word "memories" from the Cherish Simple Sentiments set. Using an old paint brush, I inked it up with the same memento ink that I used for the stamping to add color to the white cardstock. I think it added a bit more dimension.
HB12
I hope you were inspired to get Christmas started! I am already working on things for my December Daily. Happy Stamping!
12041713_10208082131999472_107061300_n

Friday, November 11, 2016

Honey Bee Stamps November Release Honey Hop!

Good Morning Honey Bees! Welcome to our November Release Honey Hop!!!
All this week we have been showing you little sneaks of our awesome new embellishments, stamp sets and dies! Well, here they all are! Everything will be available for purchase today in our shop HERE.

For the new release I worked with the 10 Things stamp set and the Joy Honey Cuts. 


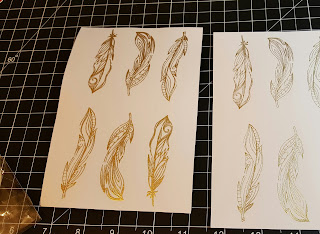
First I took Versamark ink and stamped the beautiful feathers out from the 10 Things stamp set. I embossed them in Guilded Embossing Powder from Brutus Monroe. 


Next I took my Altenew Crimson ink and my Clarity stencil brush to blend the color on my cardstock. 

Then I took my Versamark ink and inked the edge of the cardstock. I used the same embossing powder to add a gold distressed edge. 
Here is the finished card. 

I used the Joy Honey Cuts to create the title. For the final touches, I mounted it on a red card base and added pick Nuvo Drops. 
I hope you enjoyed my card. 


Oh and what’s a Honey Hop without some sweet prizes, right? One winner will win a gift certificate to purchase new goodies in the Honey Bee Stamps Store.
All you have to do to win is comment here on the Honey Bee Stamps blog and again at each one of our designer’s blog by Sunday, November 13th. Winner will be announced on Monday, November 14th at Noon PST.

So Hop along and get ready to BEE inspired! You should have arrived here from: Lesley Oman and next you will go to:Melissa Bickford

Thanks for Hopping along! I hope you enjoy it!!


Monday, October 10, 2016

Grunge Halloween

It's Lisa here, today I am sharing a new card I created for Halloween. This was such a fun card to make using alcohol inks, distress inks, stamping, cutting the Freebie Friday SVG and more! Keep reading for all the details!
p6
I started this card using the Tim Holtz Distress Stamping Paper and the Tim Holtz Alterations Spider Web Embossing Folder. I ran the paper through my Sizzix Big Shot machine to emboss the spider web to add some texture to the paper.
p1
I then used Adirondack Brights Alcohol Ink by Ranger. I sprayed the cardstock first with the distress sprayer, then dropped several drops of each color on my cardstock. The ink will start to spread across the paper, moving with the water. I then used a medicine dropper to drop a couple of drops of Isopropyl Alcohol onto the cardstock. This made the ink spread out thinner and created an even greater design. I dried the cardstock with my heat gun, then I used the Tattered Angels Glimmer Mist spray to add a little black glimmer to the cardstock.
p2
Once my background was created, I stamped my words on cardstock using the Honey Bee Stamps Brush Grunge Alpha set  for the "Halloween" and the Honey Bee Stamps Sweet as Honey set for the "Happy".
p3
Next it was time to work on the pumpkins. I went to Honey Bee Stamps blog and downloaded the Freebie Friday Pumpkin file. I then cut the pumpkins out on different patterns of cardstock. I inked the edges of the pumpkins with Distress Ink and then they were ready to go!
p4
To finish off the card, I added some black webbing that I found at Dollar Tree last year around Halloween time. It added just the right amount of texture to create interest to the card. The pumpkins were placed on top with pop dots and the card is complete!
If you haven't tried playing around with alcohol ink, I highly recommend it. It's a lot of fun! I hope you enjoyed this card & be sure to download the pumpkin SVG file by the end of today! Also check out the Brush Grunge Alpha set. There are so many possibilities with this set.
p6
Happy Crafting!
Lisa

Thursday, August 25, 2016

Honey Bee Stamps Honey Hop


Good Morning Honey Bees! 
Welcome to Honey Bee Stamps August release Honey Hop!!!
All this week Honey Bee Stamps has been showing you little sneaks of the awesome new stamp sets and dies on their Facebook page and the Facebook Event Page!
You should have arrived here from Deepti Stephens. If not, and you want to start at the beginning go to the Honey Bee Stamps page.

I created a couple of cards using the brand new Zen Bouquet stamp set. This set was so much fun to work with and I love that the main floral bouquet is almost 6 inches!

The first card I have for you today is something I also paired with the Kindness stamp set.

For this card I water colored most of the bouquet image and then fussy cut. I placed it on a black card base with a small yellow strip to help ground the image. I added the Kindness die as well as a banner I stamped using the Kindness stamp set. 

For my next card I also used the Zen Bouquet large image, this time only partially stamping it and then heat embossing both the image as well as the sentiment from the Honey Bee Stamps Prayers stamp set.

I wanted to keep the card simple and soft yet cheerful in hopes to brighten the recipient's day. I chose some Hot Mama cardstock from Simon says stamp with some Pink Paisley patterned paper underneath the card panel.


I cut the bottom of the panel using the Simon Says Stamp curved A2 card die and then mounted the panel on some adhesive backed full sheet foam. Not quite a one layer card but still simple and will go through the mail nicely.


It is a bit hard to tell from the photographs but I also took my Spectrum Sparkle pen (clear) and colored in all of the florals in the bunch to give them a little highlight and shimmer. I then added a few Crystal Clear sequins with some Ranger Multi Medium Matte adhesive.


I placed the panel on a top fold A-2 size card base. 

Did you happen to notice the shadow around the Praying sentiment and florals? Even though I wanted to keep a lower profile on the card I did want to have more pop and a dimensional look. I took my C5 copic marker and slowly went around the image and lettering. You need to be careful when doing this on top of embossing as copic markers can stain the embossing. A quick fix for this though is to take your colorless blender and do a quick clean up.


Thanks so much for stopping by! Be sure to leave a comment to be entered to win. Also, if you follow me, I will be doing a drawing for a winner on Sunday as well! So be sure to click up on the top right to follow me!
Next up on the hop is our final designer, Jenny Lee Yamasaki
I hope you have enjoyed the hop!!! Thanks for visiting, commenting and following!


Monday, July 18, 2016

Bless You

Happy Monday!
It's Lisa here to share a card I made using the new Bless Your Heart set.
20160424_235921-1
For this card I cut a piece of Arches watercolor cardstock using a cross stitch die set and watercolored a background with Twinkling H2O's.

I heat embossed the sentiment using Ranger Ink's black detail embossing powder. Layered that on a piece of patterned paper from Pink Paislee and mounted it on a black card base.

I finished the card by adding some twine and sequins from The Crafty Pickle.
This is a beautiful set to let someone know you care. So many ways to make these stamps into a meaningful sentiment.

I hope you enjoyed my card today!
Happy Stamping!
12041713_10208082131999472_107061300_n

Monday, May 2, 2016

Mood Board Challenge

Good Morning Crafty Friends! Honey Bee Stamps is happy to announce our first Mood Board Challenge. We want all of our friends to join us in creating something inspired from the Mood Board. There will be prizes drawn from the entries received. Please see below 13015345_10208121512828919_4186936398311942132_n
for the rules and participation information.

Here is a fun Mother's Day card I made using the Beautiful Life and Hand Lettered Alpha to create a fun Mother's Day card!


Now, let's see what you can create. Please let the mood board inspire you to create a project. Post your creations to the Honey Bee Stamps Facebook page or Instagram. Be sure to use the hashtags so we can find you!!
#HoneyBeeStamps and #HBSChallenge

Happy Stamping!!!! 

Tuesday, April 19, 2016

Honey Bee Stamps' Birthday Blog Hop

Hi and welcome to Honey Bee Stamps' 1st Birthday Blog Hop!!!
Thanks for joining us on our week long birthday celebration! Today the designers are featuring the brand new stamp set “Happy Everything” with a sweet little kit put together by me. We have lots planned for you this week and of course lots of prizes! Just leave a comment on our designer’s blogs along your hop for your chance to win!
You should have arrived here from Carrie Bryant's Blog, but if not click here to start at the beginning!

Today I created a Birthday Card using the Honey Bee Stamps new set called "Happy Everything". The Design Team members were given the challenge of creating something from a kit that I assembled for the team.
First I took the veneer wood hearts and painted them with acrylic craft paint to match the colors in the kit. 

Then I took a mini envelope punch and punched out the mini envelopes in the black cardstock that was included in the kit.

I used squeezed lemonade distress ink to create the yellow background as a base for the design.

The kit included some sequins and tiny hearts so I used them to create the heart explosion coming out of the envelopes. I used my gelly roll pen to add the dots around the edges of the envelope to show the lines off a little better.
Finally, I assembled and stamped my sentiment.
I hope you enjoyed this card & check out all the new releases for Honey Bee Stamps. If you haven't joined the facebook event this week, be sure to as there are great prize giveaways.
Thank you for stopping by my blog! your next stop is Kendra Sand.

Don't forget to leave a comment before you go! I have a little prize and I will be drawing the winner from everyone that comments here and follows my blog!!
You will also be entered into the drawings for the Honey Bee Stamps' prizes!!

Order of Blog hop
                                     Happy Stamping!

Tuesday, January 26, 2016

Pocket Letter Fun!

Hi Crafty Friends! I just popped on to share a couple of pocket letters that I created recently to swap on the pocket letter Facebook group.
This first pocket letter I created using the JoAnn's $1 line of scrapbooking products. Most all of the items you see came from that section. How fun to stretch your creativity and dollars at the same time!


The second pocket letter was created working with all different types of mediums. I used sprays, distress inks, templates, texture paste, and more!


Thanks for stopping by & looking at the pocket letters. Catch you again soon. Happy Creating!!


Tuesday, January 19, 2016

CHA 2016 Block Party & Ranger Booth

Hi Crafty friends! I just got back from CHA in Anaheim & wanted to share some pictures and fun with everyone! I attended as a guest of Melissa from Honey Bee Stamps, along with Taniesa of The Crafty Pickle and Carrie from Happy Scrappin.
Friday night we attended the Block Party. We got to meet new friends & had alot of fun!


All of us @ the CHA Block Party


Saturday morning we were able to walk the CHA showroom. The first stop was Ranger Ink, we had to meet the designers. For sure Tim Holtz!!!
Tim working his magic!


Products from Tim Holtz & Ranger


Dyan showing her new products!


Inspiration Boards at the Ranger Booth.


More Ranger Inspiration

Carrie and I stopped at the Make & Take table at Ranger. Here are some pictures from our fun!


I hope you enjoyed seeing a few pictures from CHA. Look for my other posts coming soon to spotlight the rest of our trip.

Happy Crafting!!
Lisa


BLOG TEMPLATE BY DESIGNER BLOGS