Showing posts with label Tim Holtz. Show all posts

Friday, August 9, 2019

Tonic Studios Garden Party Blog Hop Day 2

Hi crafty friends!
 I am so honored & excited to be joining Tonic Studios to celebrate their Garden Party Release! Tonic Studios is doing AMAZING GIVEAWAYS along the hop. Be sure to comment to enter to win a $25 gift card on each stop on the blog hop!! 
Also, Tonic is generously offering a discount for each of the hoppers. 
If you click here: US SHOPPERS & UK SHOPPERS you will automatically save 15% off of your purchase! YAY for a discount!!!

Now, onto my projects!
 For today's hop I created two cards using the Flora Background Stamp Set , the Hello Sentiment Strip Die and the Nuvo Aqua Shimmer Glitter Gloss Midas Touch Pen. This gorgeous background stamp is 6x8 and is so fun to color.
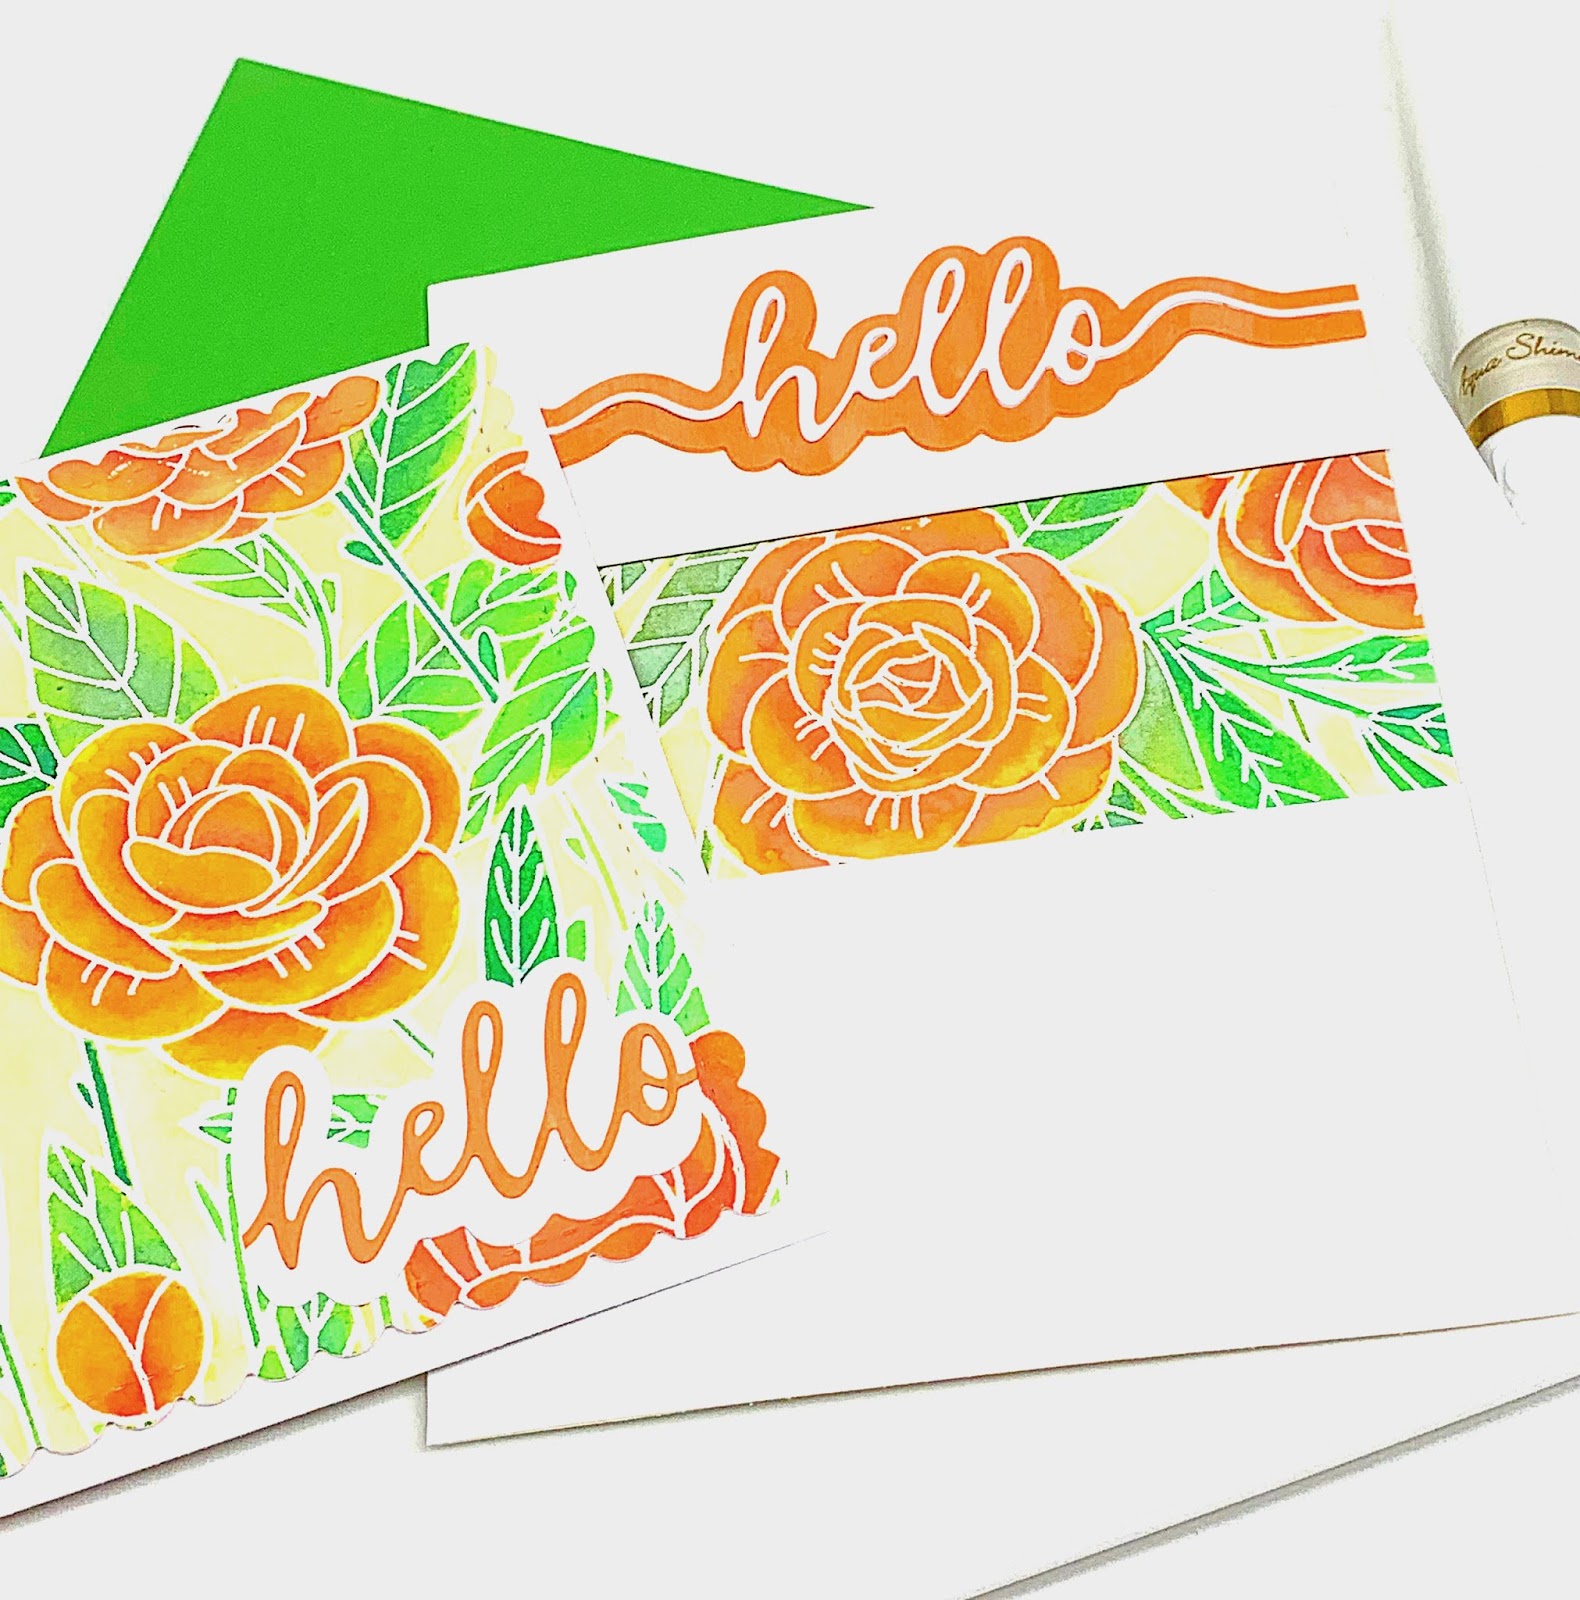
 I spent some down time coloring this beauty using my Distress Oxide Inks and water. I used Spiced Marmalade, Barn Door, Old Paper, Mowed Lawn, and Peeled Paint. Once I finished coloring the 6x8 image, I decided that I wanted to make two cards using the panel. 


For the Hello Sentiment Strip Die , I swiped the Spiced Marmalade ink pad across my cardstock so it matched my florals. It turned out to be the perfect match! 


Be sure to hop along, here are the links:

                                  Lisa Cisneros ((YOU ARE HERE))


Thank you so much for stopping by & I hope you enjoyed my projects today!! Be sure 
to comment to be entered to win a $25 gift card on my blog. Also if you want to shop 
for all the amazing new release products, please
 click here to save 15%:   US SHOPPERS & UK SHOPPERS


Thursday, June 27, 2019

Trinity Stamps Anniversary Blog Hop

Hi Friends!! Thank you so much for stopping by on the blog hop. I am so excited to be participating in Trinity Stamps' One Year Anniversary Blog Hop! I hope that you enjoy the hop and are in love with all of the new release!


The Narrow Card & Envelope Dies set comes with alot of fun pieces.
 This narrow scalloped & stitched card was so fun to use. I used Distress Oxides to stencil in the rays and taped off the edges to make the scallop border pop!


The Narrow Card & Envelope Dies envelope die has a heart and a postage stamp die, so I cut and colored these with Distress Oxides. The With Love dies were cut also part of this awesome die set! I used Squeezed Lemonade Distress Oxides to color those words.
Using the Layered Confetti Stencil Set, I again used my Distress Oxides to create the streamers and confetti on the envelope. Perfect for a fun birthday card!


The next person in the lineup is the AMAZING Laurie Willison
Don't forget to stop and comment along the hop to be entered to win prizes! If you need to start from the begining, click here.

Be sure to stop in and shop. There are lots of amazing new embellishments & 
some fun freebies with a purchase!


Thank you so much for stopping by! 
Crafty Hugs,
Lisa

Friday, September 21, 2018

Honey Bee Stamps & Heffy Doodle Collaboration Insta Hop !


Hi Crafty Friends! 
I am so excited to be participating in the Honey Bee Stamps & Heffy Doodle 
Collaboration Hop on Instagram.
Please be sure to stop by my Instagram here: Lisa Cisneros to join in on the hop.

For this card, I used the Honey Bee Stamps Birds & the Bees Stamp set & coordinating Honey Cuts, the Honey Bee Stamps Happy Honey Cuts Die & the Heffy Doodle Wingman Stamp & Die set.

Thanks for stopping by & be sure to join us on the Instagram hop! Leave comments on the hop to be entered to win a $30 gift card from both companies. Winners will be posted on their blogs on 9/28.
Hugs,
Lisa

Tuesday, May 1, 2018

Honey Bee Stamps Spring Release Blog Hop

Hello friends! Thank you so much for stopping by on the hop. I am so excited to show you some fun, new products today!
The Honey Bee Stamps Spring Release is now available in the store. (affiliate links are used)

Be sure to visit each blog & leave a comment to be entered to win!!! Honey Bee Stamps will be giving away two $50 gift cards to the Honey Bee Stamps store, one from each day AND four Bee Organized prize packs. The winners will be posted on their blog May 5th.

Now, on to my projects from the release. 
The first project I created using the Spring Blossoms stamp & Spring blossoms Honey Cut dies. I colored these florals using Copic R22, R32 and R11. I outlined the floral cluster I created in BG10. The sentiment is one I just adore from the Love Bug Sentiment stamp set.


For my next card, I used the Little Ladies stamp set and Little Lady Honey Cut dies. I also used the Grass Border Honey Cut die and the clouds are from the Heaven Sent stamp set & Heaven Sent Honey Cut dies.

The lady bugs are colored using Copic Markers: R24, R27, R29, C3, C7, C9. The grass and sky are colored using Distress Oxides: Broken China , Cracked Pistachio & Lucky Clover


The final project is a mother’s day Card that I created for my amazing mother to celebrate Mother's Day. She is always my biggest champion & what better way to show her than these florals!

I used  the Spring Blossoms stamp & Spring blossoms Honey Cut dies.  I also used the Branch & Leaves Honey Cut dies. I also used the Best Parents stamp set. To color the flowers I used Copic Markers: R11, R22, R32. For the tree branch and leaves, I used: YG03, YG67, YG99, E15, E25, E27, E29. For the background, I used Distress Oxide ink in Peacock Feathers


Here is the fantastic lineup:
Lisa Cisneros (you are HERE)
Thank you so much for stopping by & don’t
 forget to comment to be entered to win!!

Wednesday, November 8, 2017

Season's Tweetings Blog Hop


Hi Friends!!
Thank you for stopping by for the Honey Bee Stamps Season's Tweetings Blog Hop. The Honey Bee Stamps Holiday Release is now available in the store. Affiliate links provided at no cost to you. Thank you for your support.


For today's projects, I created a fun winter scene using the Season's Tweetings stamp set and coordinating dies. For the background of the card, I used the Tim Holtz layering tree stencil with Peeled Paint Oxide Ink.

Next I took my Tim Holtz blending tool and blended a soft sky with Broken China Oxide Ink. At the very top, I hit the edges harder to give it a cloudy affect.

After getting the sky completed, I cut out the Hills border dies to create the look of snowy hills for my birds. I also used the Tim Holtz blending tool with Broken China Oxide Ink to create a little color on the snowy hills.

I stamped the bird images with Ranger Archival Ink, and colored the images in with Prismacolor pencils. Once the images were finished up, I used the Sakura Glaze Black gel pen to dot their eyes to make them pop! Lastly, I added a layer of Glitter Nuvo drops "Fresh Snowfall" to the top of the snowy hills for a little sparkly fun!!


Thank you so much for stopping by! Be sure to visit each blog & leave a comment, you don't want to miss out on the fun prize!!! We will be giving away a $50 gift card to the Honey Bee Stamps store.
The winner will be posted on the Honey Bee Stamps blog on Monday, November 13th.

The Blog Hop lineup is:
                            Lisa Cisneros  <YOU ARE HERE>

Friday, September 29, 2017

Honey Bee Stamps Stamptember Collaboration


Hi Crafty Friends!!! I am so excited to be sharing the Honey Bee Stamps Stamptember set. This
           set is called Remarkable You. This set is available for a limited time while supplies
                                      last.  (affiliate links are used at no cost to you. Thank you for your support!)
              Here is a fun card I created using the Remarkable You set and the Busy Bees stamp set.


                                               Thanks for stopping by & I hope your day is fantastic!!

Tuesday, June 27, 2017

A Honey Bee Hello!


Today I am sharing a fun card that I created using Honey Bee Stamps products. 
*In order to support my blog, Affiliate links are used where available at NO cost to you. Thank you for your support!*

First off, I cut the Stacking Hexagon Cover plates dies and cut them using Bazzill Basics cardstock.  
Once I had them all cut, I layered each one using the Nuvo Deluxe Adhesive because it gives you a minute to get it situated and dries clear! I used Scor-Tape on one of the bee images. I just love how strong it is!


 Next up I stamped and cut out the Busy Bee stamp set & coordinating dies and the Hello set and coordinating Honey Cut dies.  

I embossed the word Hello using the Hero Arts Heat Tool and some Nuvo Crystal Clear Embossing Powder and Avery Elle Mimosa Pigment Ink
 I colored the bee images in with my Copic Blending Trio Markers on some Neenah Classic Crest Smooth 110 lb cardstock. 

I also put the Hampton Arts Mini Action Wobblers behind the two Busy Bee stamps  just to make the card that much more fun!
I hope you enjoyed my project today.  Thanks for looking and have a fantastic day!!

Saturday, June 24, 2017

Bee Happy!

Hi Crafty Friends!

Today I am sharing a fun card that I created using Honey Bee Stamps products. Be sure to click the link and visit the shop for the flash sale. Use the code : summer

*In order to support my blog, Affiliate links are used where available at NO cost to you. Thank you for your support!*


This card was so much fun  to create! Have you ever had a day that you felt a little down? Today was that day for me, so I made myself pick some supplies that I love and just see what happened. LOL! Well, here are the results. 

First off, I cut the Stacking Hexagon Cover plates dies and cut them using Bazzill Basics cardstock.  
Once I had them all cut, I layered each one using the Nuvo Deluxe Adhesive because it gives you a minute to get it situated and dries clear! I used Scor-Tape on all the bee images. I just love how strong it is!


 Next up I stamped and cut out the Busy Bee stamp set & coordinating dies , the Build a Bee stamp set and coordinating dies, and the Bee-you-tiful sentiment set and coordinating dies
 I colored the bee images in with my Copic Blending Trio Markers on some Neenah Classic Crest Smooth 110 lb cardstock. 

I also put the Hampton Arts Mini Action Wobblers behind the two Build a Bees just to make the card that much more fun!
I hope you enjoyed my project today. It sure helped pick me up and get crafty again! Thanks for looking and have a fantastic day!!

Friday, April 28, 2017

Honey Bee Stamps Birthday Bash Surprise Blog Hop!

Hello crafty friends!! Welcome to Honey Bee Stamps 2nd Birthday Bash & SURPRISE Blog Hop!

Today I am sharing with you a fun Hive shaped card. Honey Bee Stamps released this fun hive card die today. What a fun interactive card. I love the options for the doors!!

I used my comic markers to create a textured background on the hive. The doors knobs are hexagons from the Hexagon layered background Honey Cut die set.

I used the Busy Bees, Build a Bee, and Free Bees sets to decorate my hive. The Free Bees are a customer appreciation gift with purchase.

And peekaboo! That sweet bee is behind the door to say hi! Lol!!
Be sure to hop along for all the fun, inspiration & prizes!!


Each stop on the hop will have a drawing for a free stamp set of the winners choice from the Honey Bee Stamps store. Be sure to comment at each stop to enter all of the drawings. The winners will be announced on the Honey Bee Stamps Blog on May 3rd at Noon PST.


Here is the lineup for the Hop:

Honey Bee Stamps

Jennifer McGuire

Stephanie Klauck

Amy Rysavy

Lisa Cisneros (You are HERE)

Sandy Allnock

Taniesa Vlasak

Yana Smakula

Nichol Spohr

Thank you so much for joining in on the fun! Make sure to leave a comment to be entered to win one free stamp set from Honey Bee Stamps.

Happy Hopping!!

Friday, March 31, 2017

Honey Bee Stamps & Misti Blog Hop!

Welcome to the Honey Bee Stamps and My Sweet Petunia's Misti Blog Hop! We are so glad you joined us for this fun collaboration blog hop. We have lots of talented ladies on both design teams that will surely inspire you along the way. Be sure to leave comments during the blog hop so you can be entered to win a Mini Misti and a $45 Honey Bee Stamps gift certificate!!

Hi Crafty Friends! Lisa here to share with you a fun Birthday card I created using some newly released Honey Bee Stamps products and the Mini Misti.

I have recently been browsing Splitcoast stampers forums and galleries. When doing so, I came across a technique that Lydia shared a video of. It looked so fun, I had to try it.
First I gathered my new Distress Oxide Inks in Cracked Pistachio and Worn Lipstick, Water, Craft Mat, Paint Brush and Cling wrap.
Once I had all that together, I wet my Tim Holtz Watercolor cardstock piece down with my Distress Sprayer. I then smooshed the ink onto my craft mates and began spreading it all over my cardstock. As soon as I had good coverage I grabbed the cling wrap and tore a piece off and places it on top of the cardstock. This has to be done while it's wet.
               
You have to make sure you scrunch up the cling wrap real well. Then you set it aside to dry completely. Here is how they looked once dry and the cling wrap removed. Pretty cool, right??
Next, I grabbed my Mini Misti to start working on stamping my background. I wanted to create a look of patterned paper using my Hooray stamps. The Misti is perfect for this. You can line them up over & over to get the perfect stamped background. So fun, quick and easy. What a time saver this Misti is!!! A crafting must for all the stampers for sure!

Once I stamped the entire background I grabbed my Hooray & Rectangle Stitched Border Honey Cut dies to cut out the word and border. 

I then used the distress oxides again to blend a background for the balloons from the Celebration Box Set  This makes it super easy, just color, stamp and cut!!


Here is a close up of the finished card. 

Thanks for hopping along with us. Below is a list of the hop members: 

Thanks again for hopping along & don't forget to leave a comment on each blogpost to be entered to win the awesome prizes!!

Tuesday, January 26, 2016

Pocket Letter Fun!

Hi Crafty Friends! I just popped on to share a couple of pocket letters that I created recently to swap on the pocket letter Facebook group.
This first pocket letter I created using the JoAnn's $1 line of scrapbooking products. Most all of the items you see came from that section. How fun to stretch your creativity and dollars at the same time!


The second pocket letter was created working with all different types of mediums. I used sprays, distress inks, templates, texture paste, and more!


Thanks for stopping by & looking at the pocket letters. Catch you again soon. Happy Creating!!


BLOG TEMPLATE BY DESIGNER BLOGS