Showing posts with label scrapbooks. Show all posts

Tuesday, May 15, 2018

I Miss You Florals

Hi Friends!
Today I am sharing a card I created using the Honey Bee Stamps Spring Blossoms stamp & Spring blossoms Honey Cut dies. These florals are some of my favorite images from this release!!

I colored these florals using Copic R22, R32 and R11. The sentiment is one I just adore                                             from the Love Bug Sentiment stamp set.


  I also used the Branch & Leaves Honey Cut dies. I also used the Best Parents stamp set.                            To color the flowers I used Copic Markers: R11, R22, R32. 

For the tree branch and leaves, I used: YG03, YG67, YG99, E15, E25, E27, E29. For the                                 background, I used Distress Oxide ink in Peacock Feathers. 


Thank you so much for stopping by! 
Happy Crafting, Lisa
(affiliate links are provided at no cost to you. Thank you for your support!)

Tuesday, June 27, 2017

A Honey Bee Hello!


Today I am sharing a fun card that I created using Honey Bee Stamps products. 
*In order to support my blog, Affiliate links are used where available at NO cost to you. Thank you for your support!*

First off, I cut the Stacking Hexagon Cover plates dies and cut them using Bazzill Basics cardstock.  
Once I had them all cut, I layered each one using the Nuvo Deluxe Adhesive because it gives you a minute to get it situated and dries clear! I used Scor-Tape on one of the bee images. I just love how strong it is!


 Next up I stamped and cut out the Busy Bee stamp set & coordinating dies and the Hello set and coordinating Honey Cut dies.  

I embossed the word Hello using the Hero Arts Heat Tool and some Nuvo Crystal Clear Embossing Powder and Avery Elle Mimosa Pigment Ink. 
 I colored the bee images in with my Copic Blending Trio Markers on some Neenah Classic Crest Smooth 110 lb cardstock. 

I also put the Hampton Arts Mini Action Wobblers behind the two Busy Bee stamps  just to make the card that much more fun!
I hope you enjoyed my project today.  Thanks for looking and have a fantastic day!!

Tuesday, April 19, 2016

Honey Bee Stamps' Birthday Blog Hop

Hi and welcome to Honey Bee Stamps' 1st Birthday Blog Hop!!!
Thanks for joining us on our week long birthday celebration! Today the designers are featuring the brand new stamp set “Happy Everything” with a sweet little kit put together by me. We have lots planned for you this week and of course lots of prizes! Just leave a comment on our designer’s blogs along your hop for your chance to win!
You should have arrived here from Carrie Bryant's Blog, but if not click here to start at the beginning!

Today I created a Birthday Card using the Honey Bee Stamps new set called "Happy Everything". The Design Team members were given the challenge of creating something from a kit that I assembled for the team.
First I took the veneer wood hearts and painted them with acrylic craft paint to match the colors in the kit. 

Then I took a mini envelope punch and punched out the mini envelopes in the black cardstock that was included in the kit.

I used squeezed lemonade distress ink to create the yellow background as a base for the design.

The kit included some sequins and tiny hearts so I used them to create the heart explosion coming out of the envelopes. I used my gelly roll pen to add the dots around the edges of the envelope to show the lines off a little better.
Finally, I assembled and stamped my sentiment.
I hope you enjoyed this card & check out all the new releases for Honey Bee Stamps. If you haven't joined the facebook event this week, be sure to as there are great prize giveaways.
Thank you for stopping by my blog! your next stop is Kendra Sand.

Don't forget to leave a comment before you go! I have a little prize and I will be drawing the winner from everyone that comments here and follows my blog!!
You will also be entered into the drawings for the Honey Bee Stamps' prizes!!

Order of Blog hop
                                     Happy Stamping!

Tuesday, January 26, 2016

Pocket Letter Fun!

Hi Crafty Friends! I just popped on to share a couple of pocket letters that I created recently to swap on the pocket letter Facebook group.
This first pocket letter I created using the JoAnn's $1 line of scrapbooking products. Most all of the items you see came from that section. How fun to stretch your creativity and dollars at the same time!


The second pocket letter was created working with all different types of mediums. I used sprays, distress inks, templates, texture paste, and more!


Thanks for stopping by & looking at the pocket letters. Catch you again soon. Happy Creating!!


Tuesday, January 19, 2016

CHA 2016 Block Party & Ranger Booth

Hi Crafty friends! I just got back from CHA in Anaheim & wanted to share some pictures and fun with everyone! I attended as a guest of Melissa from Honey Bee Stamps, along with Taniesa of The Crafty Pickle and Carrie from Happy Scrappin.
Friday night we attended the Block Party. We got to meet new friends & had alot of fun!


All of us @ the CHA Block Party


Saturday morning we were able to walk the CHA showroom. The first stop was Ranger Ink, we had to meet the designers. For sure Tim Holtz!!!
Tim working his magic!


Products from Tim Holtz & Ranger


Dyan showing her new products!


Inspiration Boards at the Ranger Booth.


More Ranger Inspiration

Carrie and I stopped at the Make & Take table at Ranger. Here are some pictures from our fun!


I hope you enjoyed seeing a few pictures from CHA. Look for my other posts coming soon to spotlight the rest of our trip.

Happy Crafting!!
Lisa


Sunday, November 15, 2015

Stamping with Gelatos & Distress Inks

It's Lisa here to share my newest cards created by stamping with Gelatos and Distress Inks. I received the new release stamps and was so excited to play around with them, I created a couple of cards for this blog post.
The first card I grabbed the Special Delivery Stamp set, Gelatos and my Distress sprayer.
HB3
I used the gelatos to create the background. Rubbing the gelato all over the cardstock & then wiping a baby wipe over the top so that it blended the color in.
HB1
Once the background was completed, I used the lips stamp to stamp on the background. I first used Memento Rose Bud ink, then I used the hot pink Gelato on the stamp as "ink". This gave the background a multi-colored look.
HB2
Finally, I stamped the Sending Kisses sentiment and framed out the card in black Bazzill cardstock.
HB4
Here is the finished card that I added a Baker's twine bow to finish it off.
HB6
Now, really quick I wanted to mention Honey Bee Stamps newest addition to their line. The 2x2 stamps. These are so awesome! They can be used for so many different types of cards or layouts. Here is a quick 5 minute Project Life card that I put together to show how cute this stamp is!!
For this card, I used the Lotus Blossom stamp, Memento Tangelo Ink and Distress Inks in Dried Marigold and Wild Honey.
HB7
Once that was finished, I stamped out the image to decide which color I liked, ultimately going with the Tangelo & Dandelion Inks from Memento. I used the  Distress Ink in Wild Honey to create the background color. Once the background was finished, I stamped the image several times with both colors across the card randomly. I also used the two Tangelo stamped images from my tester sheet to paint with Distress Ink & Fussy Cut.
I stamped the sentiment "Love This Moment" from the Cherish Stamp set. I used pop dots to attach the sentiment and the fussy cut flowers. This was a quick card that turned out cute. Scrapbooking made simple for sure!!!
HB8
Thank you for stopping by & I hope you take a look at all the new stamps that are available now http://www.HoneyBeeStamps.com

Saturday, November 14, 2015

Sweet as Honey Plans

It's Lisa here, and today I am sharing my planner for this week. I had so much fun creating this week's layout using the Sweet as Honey set. This set has a lot of fun small stamps that are perfect for decorating your planner.
3
I also used Honey Bee Scraps SVG files to cut out some images to add dimension to my planner. Paper adds dimension without adding too much bulk. I am a fan of fun pages, but since I use this as a work planner, I prefer it to not get too heavy.
On the right side I used several different stamps from the Sweet as Honey set. The tiny bees and honey combs are super cute and so much fun!! To create the bullet points I used the tiny honeycombs. I covered all the lines on the page using Washi Tape. This is another great way to decorate without adding too much bulk to your planner.
2
On the left side I used the tiny bee, two of the large bees and both honeycombs to give a different look. Again, covered the lines with washi tape and printed some page flags on sticker paper to add interest.
1
Products Used:
I hope you enjoyed looking this week's planner layout. Thanks for stopping by & Happy Planning!!
Lisa Cisneros

Friday, November 13, 2015

Planner Pretties!

It's Lisa here, sharing my weekly planner layout. This week I used a monochromatic pink theme utilizing the Honey Bee Stamps Not Too Shabby set.
On the right side of the week, I used the washi to outline all of my days & accented using Close To My Heart shapes cute from on the project life cards. I stamped the tiny stars to use as bullet point for my appointments and meetings.
101
On the left side of the week, I mirrored the same using the washi and the tiny stars. I also used the bunting stamp as a weekend banner.
100
Honey Bee Stamps has a ton of tiny stamps that are perfect for the planner. Notice above that I used the tiny stars, the banner and the tiny bows in the boxes. I also used the wreath, the bouquet and the sweet sentiments as accents from the Honey Bee Stamps Not Too Shabby set.
Thanks for stopping by, I hope you enjoyed looking at my week's planner layout.

Thursday, November 12, 2015

Thursday Planner Love!

Hi Friends & Happy Thursday!
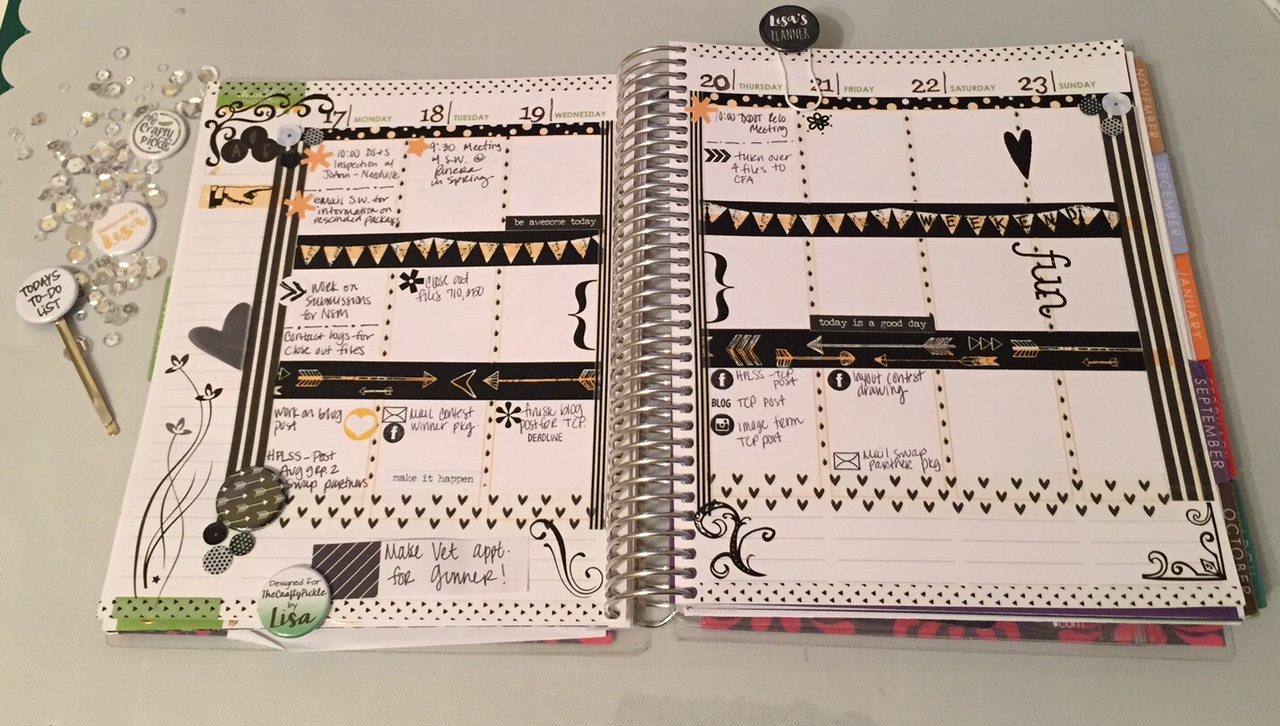
It's Lisa here today to share this week's planner layout. Planners seem to be the new trend that everyone is jumping on board.  I am a list maker & planner nerd, and loving this new trend to decorate your planner with papercrafting supplies. So if you have an everyday planner just lying around or "plan" to buy one to decorate then you definitely need to start with browsing The Crafty Pickle's new inventory. It's a planner's dream!!
I use the Erin Condren planner for my work (yes, I decorate this too!) and the MAMBI Happy Planner for a fun/smash planner.
Planning with TheCraftyPickle.com
For this layout, I was inspired by the new goodies in The Craft Pickle Shop. I covered all of the lines on the page using washi tape. This defines the boxes and makes it fun!! The Crafty Pickle just introduced the Sticky Pickle Spot Stickers. These are so awesome to accent important appointments or to just decorate with.
Adding any of the Relish Mixes to your planner gives a fun, sparkly and thin embellishment. These come in all colors, I used the Magical Mouse & Rock Candy Mixes. Who doesn't love sequins???!!!
Planning with TheCraftyPickle.com
Another thin embellishment is the flair from The Crafty Pickle. I love to decorate my planner but everything needs to be thin, these flair pieces are super thin. They are perfect to add dimension without adding bulk. Last, but certainly not least my planner clip! The Crafty Pickle has come out with personalized clips that are adorable!! I used the personalized planner clip to "bookmark" my week. That makes it super easy to grab every time I have to add something to my week!
Product List:
Thanks for stopping by and be sure to check out all the new items that are perfect for your planner!
Happy Planning!

Wednesday, November 11, 2015

Wednesday Planner Love!

Hi Friends & Happy Tuesday!
It's Lisa here today to share this week's planner layout. Planners are on trend in the Paper crafting community. The Crafty Pickle's shop will be opening back up soon. Be sure to check out all of the planner goodies in The Crafty Pickle's new inventory. It's a planner's dream!!
TCP1
For this layout, I was inspired by the new goodies in The Craft Pickle Shop. I covered all of the lines on the page using The Crafty Pickle's thin glitter Washi Tape. This defines the boxes and makes it fun!! The Crafty Pickle just introduced the Sticky Pickle Spot Stickers. These are so awesome to accent important appointments or to just decorate with. They come in asterisks, stars, hearts and circles.
Adding any of the Relish Mixes to your planner gives a fun, sparkly and thin embellishment. These come in all colors, I used the Rock Candy Mix and are super easy to attach. I used a dot of Glossy Accents to attach them. Who doesn't love sequins???!!!
I used the Project Life Everyday Line paper pad & cardstock stickers to accent my layout. I cut triangles & rectangles to accent the planner boxes which adds some color and texture to the pages.
tcp5
I also attached a "This Month" planner clip! The Crafty Pickle has come out with personalized clips that are adorable!! I used the planner clip to "bookmark" my week. That makes it super easy to grab my week!
Product List:
Thanks for stopping by and be sure to check out all the new items as soon as the store opens back up. There are so many things that are perfect for your planner!
Happy Planning!
BLOG TEMPLATE BY DESIGNER BLOGS