Showing posts with label project life. Show all posts

Tuesday, April 19, 2016

Honey Bee Stamps' Birthday Blog Hop

Hi and welcome to Honey Bee Stamps' 1st Birthday Blog Hop!!!
Thanks for joining us on our week long birthday celebration! Today the designers are featuring the brand new stamp set “Happy Everything” with a sweet little kit put together by me. We have lots planned for you this week and of course lots of prizes! Just leave a comment on our designer’s blogs along your hop for your chance to win!
You should have arrived here from Carrie Bryant's Blog, but if not click here to start at the beginning!

Today I created a Birthday Card using the Honey Bee Stamps new set called "Happy Everything". The Design Team members were given the challenge of creating something from a kit that I assembled for the team.
First I took the veneer wood hearts and painted them with acrylic craft paint to match the colors in the kit. 

Then I took a mini envelope punch and punched out the mini envelopes in the black cardstock that was included in the kit.

I used squeezed lemonade distress ink to create the yellow background as a base for the design.

The kit included some sequins and tiny hearts so I used them to create the heart explosion coming out of the envelopes. I used my gelly roll pen to add the dots around the edges of the envelope to show the lines off a little better.
Finally, I assembled and stamped my sentiment.
I hope you enjoyed this card & check out all the new releases for Honey Bee Stamps. If you haven't joined the facebook event this week, be sure to as there are great prize giveaways.
Thank you for stopping by my blog! your next stop is Kendra Sand.

Don't forget to leave a comment before you go! I have a little prize and I will be drawing the winner from everyone that comments here and follows my blog!!
You will also be entered into the drawings for the Honey Bee Stamps' prizes!!

Order of Blog hop
                                     Happy Stamping!

Tuesday, January 26, 2016

Pocket Letter Fun!

Hi Crafty Friends! I just popped on to share a couple of pocket letters that I created recently to swap on the pocket letter Facebook group.
This first pocket letter I created using the JoAnn's $1 line of scrapbooking products. Most all of the items you see came from that section. How fun to stretch your creativity and dollars at the same time!


The second pocket letter was created working with all different types of mediums. I used sprays, distress inks, templates, texture paste, and more!


Thanks for stopping by & looking at the pocket letters. Catch you again soon. Happy Creating!!


Tuesday, January 19, 2016

CHA 2016 Block Party & Ranger Booth

Hi Crafty friends! I just got back from CHA in Anaheim & wanted to share some pictures and fun with everyone! I attended as a guest of Melissa from Honey Bee Stamps, along with Taniesa of The Crafty Pickle and Carrie from Happy Scrappin.
Friday night we attended the Block Party. We got to meet new friends & had alot of fun!


All of us @ the CHA Block Party


Saturday morning we were able to walk the CHA showroom. The first stop was Ranger Ink, we had to meet the designers. For sure Tim Holtz!!!
Tim working his magic!


Products from Tim Holtz & Ranger


Dyan showing her new products!


Inspiration Boards at the Ranger Booth.


More Ranger Inspiration

Carrie and I stopped at the Make & Take table at Ranger. Here are some pictures from our fun!


I hope you enjoyed seeing a few pictures from CHA. Look for my other posts coming soon to spotlight the rest of our trip.

Happy Crafting!!
Lisa


Sunday, November 15, 2015

Stamping with Gelatos & Distress Inks

It's Lisa here to share my newest cards created by stamping with Gelatos and Distress Inks. I received the new release stamps and was so excited to play around with them, I created a couple of cards for this blog post.
The first card I grabbed the Special Delivery Stamp set, Gelatos and my Distress sprayer.
HB3
I used the gelatos to create the background. Rubbing the gelato all over the cardstock & then wiping a baby wipe over the top so that it blended the color in.
HB1
Once the background was completed, I used the lips stamp to stamp on the background. I first used Memento Rose Bud ink, then I used the hot pink Gelato on the stamp as "ink". This gave the background a multi-colored look.
HB2
Finally, I stamped the Sending Kisses sentiment and framed out the card in black Bazzill cardstock.
HB4
Here is the finished card that I added a Baker's twine bow to finish it off.
HB6
Now, really quick I wanted to mention Honey Bee Stamps newest addition to their line. The 2x2 stamps. These are so awesome! They can be used for so many different types of cards or layouts. Here is a quick 5 minute Project Life card that I put together to show how cute this stamp is!!
For this card, I used the Lotus Blossom stamp, Memento Tangelo Ink and Distress Inks in Dried Marigold and Wild Honey.
HB7
Once that was finished, I stamped out the image to decide which color I liked, ultimately going with the Tangelo & Dandelion Inks from Memento. I used the  Distress Ink in Wild Honey to create the background color. Once the background was finished, I stamped the image several times with both colors across the card randomly. I also used the two Tangelo stamped images from my tester sheet to paint with Distress Ink & Fussy Cut.
I stamped the sentiment "Love This Moment" from the Cherish Stamp set. I used pop dots to attach the sentiment and the fussy cut flowers. This was a quick card that turned out cute. Scrapbooking made simple for sure!!!
HB8
Thank you for stopping by & I hope you take a look at all the new stamps that are available now http://www.HoneyBeeStamps.com

Thursday, November 12, 2015

Thursday Planner Love!

Hi Friends & Happy Thursday!
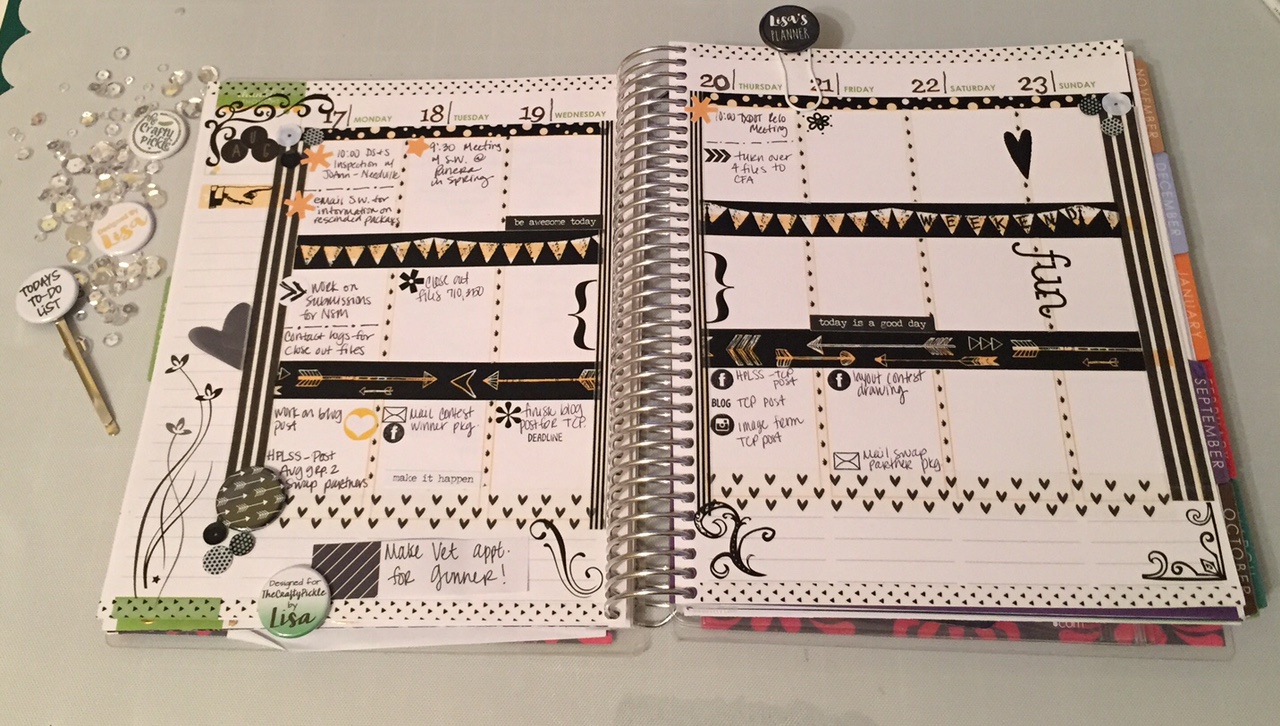
It's Lisa here today to share this week's planner layout. Planners seem to be the new trend that everyone is jumping on board.  I am a list maker & planner nerd, and loving this new trend to decorate your planner with papercrafting supplies. So if you have an everyday planner just lying around or "plan" to buy one to decorate then you definitely need to start with browsing The Crafty Pickle's new inventory. It's a planner's dream!!
I use the Erin Condren planner for my work (yes, I decorate this too!) and the MAMBI Happy Planner for a fun/smash planner.
Planning with TheCraftyPickle.com
For this layout, I was inspired by the new goodies in The Craft Pickle Shop. I covered all of the lines on the page using washi tape. This defines the boxes and makes it fun!! The Crafty Pickle just introduced the Sticky Pickle Spot Stickers. These are so awesome to accent important appointments or to just decorate with.
Adding any of the Relish Mixes to your planner gives a fun, sparkly and thin embellishment. These come in all colors, I used the Magical Mouse & Rock Candy Mixes. Who doesn't love sequins???!!!
Planning with TheCraftyPickle.com
Another thin embellishment is the flair from The Crafty Pickle. I love to decorate my planner but everything needs to be thin, these flair pieces are super thin. They are perfect to add dimension without adding bulk. Last, but certainly not least my planner clip! The Crafty Pickle has come out with personalized clips that are adorable!! I used the personalized planner clip to "bookmark" my week. That makes it super easy to grab every time I have to add something to my week!
Product List:
Thanks for stopping by and be sure to check out all the new items that are perfect for your planner!
Happy Planning!

Tuesday, November 10, 2015

December Daily - The Joy of Christmas!!!

Hi Friends & happy Tuesday! It's Lisa here to share a new Project Life card that I created. I am in the beginning stages of working on my December Daily album, so that is what inspired me to create this card.
IMG_6989
For those of you not familiar with December Daily, Ali Edwards created it to document the days of your December. Basically, you do a page for each day spotlighting the activities of the day to include your family traditions, etc. This will be my first year to do this, and I am super excited!
For this card, I started with Pink Paislee Merry & Bright 6x6 paper pad. I cut a tag and a 3x4 project life card from the paper pad. I then used The Crafter's Workshop Positive Stencil and texture paste to create the black cross or plus signs on the paper to add some dimension and interest in the corners. I doodled around all the edges with a black 0.8 American Crafts Black Pen and inked with black Memento Ink.IMG_6987
To finish off the top of the card, I used The Crafty Pickle's Black & White Color Pop Flair and wrapped a ribbon around it. I added some sequins from The Crafty Pickle. Adding any of the Relish Mixes to your layout or cards gives a fun, sparkly and thin embellishment. These come in all colors, I used the Magical Mouse mix for this card.
IMG_6988
I hope you enjoyed my Project Life card & are inspired to start a December Daily! Look for some more blog posts showing my December Daily in the future!
Thanks for looking & Happy Crafting!

Sunday, October 25, 2015

Sunday Stamping - Christmas Memories

Good Morning!
 It's Lisa here to share a Project Life card that I created using Brush Grunge Alpha and the Cherish Simple Sentiments sets. One of the great things about Honey Bee Stamps is that you can mix and match the sentiments to create your own titles!

HB10

For this card I used the Spellbinders "Build a Wreath" die set. I ran it through my Sizzix Big Shot three separate times to get the "Layers" of the wreath.
I used regular Kelly green cardstock from Michaels. Once I had all of the pieces cut for the wreath, I used Memento Cottage Ivy Ink and Distress Ink in Shabby Shutters to add shading to the cardstock.

HB11

I added red Stickles to look like berries & tied a bow for the bottom of the wreath. I then used the Brush Grunge Alpha to stamp Christmas.

p3

I inked up the stamps & stamped once on scratch paper, then stamped on my cardstock. This gave it a little more distressed appearance. I did the same process with the word moments from the Cherish Simple Sentiments set.
Using an old paint brush, I inked it up with the same memento ink that I used for the stamping to add color to the white cardstock. I think it added a bit more dimension.

HB12

I hope you were inspired to get Christmas started! I am already working on things for my December Daily.
Happy Sunday!

Friday, July 17, 2015

Project Life Card Swap's Summer Virtual Crop

Hi Creative Friends! 
I just attended Project Life Card Swap's Virtual Summer Crop this past weekend. It was a busy Saturday, but I put aside a few hours to join in on the fun & create. 
Several fun challenges were posted in the crop. Here is what I created from those challenges:

Taniesa's Shake Your Flair Challenge - Create a shaker using some sort of flair.
I used the PL Fuse tool and created a 2 x 2 square. added in sequence from The Crafty Pickle and a flair I received in the Gold Rinchie Swap on PLCS. I will be uploading a video on the shaker soon.

Taniesa's Frame A Flair Challenge 
For this one I stamped the gold circles on black cardstock using versamark ink and embossed with a distressed brass embossing powder for the background. I used flairs from my Gold Rinchie Swap again and I framed them in white cardstock stamped with two different circle stamps. 

Tara's Reduce, Reuse and Alter Scrap Supplies Challenge
For this one, my inspiration was from these old checks that I found at a Scrapbook store. I cut them up to use as part of my layering for the "Awesome" card. I used Distress Ink to age the edges of the check and the paper.

Brittany's Birthday Challenge
This was a simple one that I put together for my Aunt's birthday. I used pink washi as a border on the bottom, a premade cupcake from Michaels and a patterned background. Simple & quick!!

I hope you enjoyed seeing what I created at the crop. Hopefully it will inspire you to pull out some things & give these a try! 

Happy Crafting!!
Lisa
BLOG TEMPLATE BY DESIGNER BLOGS